How to Add Animated Weather Widget to Your Website for Free
Hi there, are you looking for a beautiful weather widget to add to your website? in this article let me share an awesome responsive and animated weather widget tool that is highly customizable to match your website design.
We were designing a website for a hotel and we had to match the website exactly as per the PSD design provided by the client. I searched for some WordPress weather widget plugins but none of them were matching our requirements. After some research, I got an online weather widget tool which is customizable to match any website.
Here I am sharing the animated weather widget tool which can be added in a WordPress website, HTML website or any other web platform with the embed code. Here is how to add animated weather widget to your website. Below is the live preview of the weather widget.
BENGALURU WEATHERYou might be also interested in-
- 8 Best Animated Icon Packs for Your Web Project
- How to Animate Font Awesome Icons to Grab Visitors Attention
How to Add Animated Weather Widget to Your Website for Free
Here is the step by step guide to add beautiful weather widget to your website using weatherwidget.io.
- Go to weatherwidget.io website
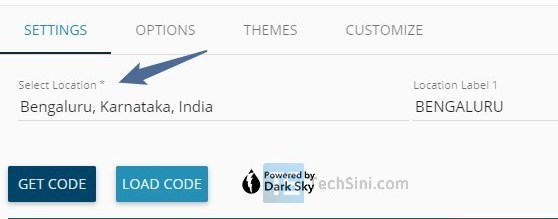
- On the “Settings” tab, enter the city name in the “Select Location” field

- Select the weather unit you need on the widget
- Now go to “Options” tab, select “Climacons Animated” option from the icon set dropdown (Note: you can choose “Climacons” or “iconvault” option if you want the static weather icons)

- In the “Current/ Forecast” dropdown, select “Current” if you want to display the current weather or choose the “Both” option to show the current and forecast in your weather widget. You can also change the widget font here, select the font that suits your website
- Go to “Customize” tab, use the color picker to change the background color and text color that matches your website theme
- Finally, click on the “Get Code” button, weatherwidget.io generates the embed code, click on the “Copy to Clipboard” button.
You can use this code in your HTML website, WordPress website or any other web platform.
To add this weather widget in the HTML website simply paste the embed code in your HTML document where you want to display the weather widget. Below is how to add this code in WordPress.
How to Add Weather Widget in Your WordPress Website
Now you have the weather widget code, you can add the weather widget in the website sidebar or footer.
To add the weather widget in the WordPress sidebar or footer – Login to your WordPress dashboard, go to “Appearance > Widgets”, drag and drop a “Custom HTML” widget in your sidebar or footer widget area and then paste the copied weather code in the content, click on the “Save” button.
To add the weather widget on the WordPress post or page, click on the “Add Block” button, move to the “Formatting” tab and then select “Custom HTML”, paste the code in the block and save the post/page.